Lab 01
Lab02: Java Comand Line and JGRasp
Compiling Java Lab 2A
Introduction
The goal for this lab is to gain experience editing, compiling and executing Java programs in the terminal and through the JGrasp IDE. You may work on this lab individually or in a group of no more than three people.
Compiling and Executing Java in the Terminal
Each of the steps below should be completed entirely inside the terminal: no GUI applications allowed. Refer back to the Unix Tutorial for Beginners if you need to refresh yourself on the necessary commands.
- Create a cs149 folder in your home directory
mkdir cs149 - Move into the cs149 directory:
cd cs149 - Create a folder inside your home directory named
lab02.
mkdir lab02 - Move into the lab02 directory:
cd lab02 - Copy the file
/cs/shr/cs149/code/Welcome.javainto thelab02directory:
cp /cs/shr/cs149/code/Welcome.java Welcome.java - Confirm that you completed the last two steps correctly by using the
pwdcommand (to confirm that you are in thelab02directory) and thelscommand (to confirm that you successfully copiedWelcome.java). - Examine the contents of
Welcome.javausing thecatcommand. - Compile
Welcome.java:$ javac Welcome.java
- If all goes well, this command should not produce any output to the terminal window, but it should create a new file named
Welcome.class. - Examine the contents of
Welcome.classusing thecatcommand.Don't worry! The contents shouldn't make sense to you. They wouldn't make much sense to anyone. Why not?
(Click for the answer.)
- Now that
Welcome.javahas been compiled, it can be executed:$ java Welcome
Notice that the.classextension is not included. - Congratulations! You've successfully compiled and executed your first Java program.
Editing Files in the Terminal
Normally, we will be using an Integrated Development Environment (IDE) to edit and compile Java programs. However, it can sometimes be convenient to edit a file directly in the terminal. There are many terminal-based editors. Today we'll try nano because it is easy to use for beginners.
- Open
Welcome.javausingnano:$ nano Welcome.java
You should see something like the following:
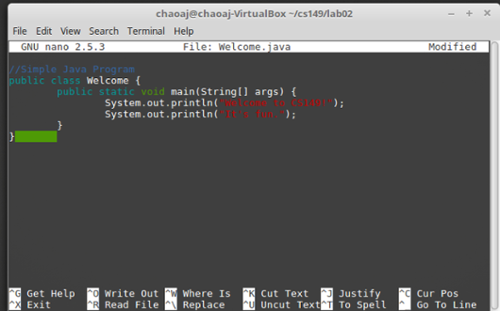
The two lines of text at the bottom show the set of actions available in the editor. The "^" symbol indicates the "Ctrl" key. For example, pressing Ctrl-O will "WriteOut" (save) any changes you have made to the file.
- Edit the file so that the welcome message says
"It's REALLY fun."instead of"It's fun.". Save your changes and exit. - Try executing your program again:
$ java Welcome
Does the output reflect your changes? Why not?
(Click for the answer.)
- Recompile then Execute your modified Java program:
javac Welcome.java
java Welcome
Web-CAT Submission
We will be using Web-CAT this semester for automated submission and testing.
- Access https://webcat.cs.jmu.edu in a web browser.
- You should be able to log in using your eid and password.
- Use the "Browse..." button to select your modified
Welcome.javafile. - If you are working with a partner, use the "Choose Partners..." button to add them to the submission.
-
Click the button labeled "Upload Submission". After a few seconds you should be taken to a page labeled "Your Assignment Submission Results". Near the top of that page you should see a box that looks like the following:

Congratulations! You have submitted successfully.
- If your submission didn't receive 10/10 points, take a few minutes to figure out what went wrong. The section labeled "Estimate of Problem Coverage" may provide some hints. If you find the problem, fix it and resubmit. If you can't find the problem, ask your instructor for help.
Fixing Syntax Errors
- Copy the file
/cs/shr/cs149/code/Personal.javainto yourlab02directory. - Compile
Personal.java. - You should see several error messages printed to the terminal:
Personal.java:6: error: unclosed string literal System.out.println("Hello " + args[0] + "!); ^ Personal.java:6: error: ';' expected System.out.println("Hello " + args[0] + "!); ^ Personal.java:7: error: illegal start of expression System.out.println("Welcome to CS149."); ^ Personal.java:7: error: ';' expected System.out.println("Welcome to CS149."); ^ 4 errors - Compiler-generated error messages often seem overwhelming and difficult to understand. Two rules of thumb can help:
- Address errors in the order they appear. Fix the first error, then re-compile. In many cases the later errors aren't really errors at all; they occur because the compiler was confused by an earlier error.
- Read the error messages carefully. The text of the error messages can be confusing, but they often contain useful information if you take the time to read them.
- Fix the errors and try out the resulting program. This program takes a single command-line argument specifying the name of the person who should be welcomed:
$ java Personal Alvin
Hello Alvin!
Welcome to CS149.
Acknowledgements This lab is based on a lab designed by Nathan Sprague.
jGrasp Lab2B
Objectives
-
Use an IDE (Integrated Development Environment).
-
Edit, save, compile, and run a simple Java program.
-
Recognize and correct syntax errors in a Java program.
Key Terms
- source file
- the Java program as written by the programmer
- class file
- the executable program produced by the compiler
- compile
- process of checking syntax and producing a class file
- syntax error
- mistake in the source code that prevents compilation
- logic error
- mistake in the program that causes incorrect behavior
- execute
- the process of running a program on a computer
Part 1: Java Development Cycle
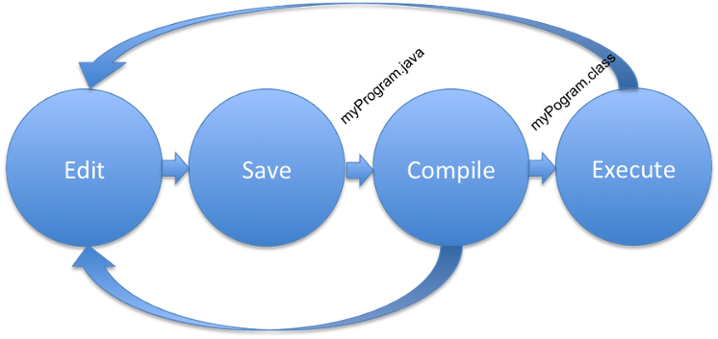
jGRASP is a text editor designed to simplify the process of editing, compiling and executing Java programs.
-
Open jGRASP and click "File –> New –> Java" from the menu.
-
Type in the code below into the editor window. Change the
@authorto your name and@versionto today's date. Pay attention to all spelling, punctuation, and indentation./** * Hello world program. * * @author Alvin Chao * @version 1/18/2016 */ public class Hello { public static void main(String[] args) { System.out.println("Welcome to CS149!"); } } - Indentation doesn't matter to the Java compiler, but proper indentation makes code much easier for humans to read. Click the "Generate CSD" button
 in the toolbar to indent the code and display a "Control Structure Diagram". Clicking the "Remove CSD" button
  removes the diagram, but leaves the code properly indented. Try it out.
 -
Compile your Java program by clicking the
 button on the toolbar.
-
If it compiles successfully you should see a message like the following under the "Compile Messages" tab:
 ----jGRASP exec: javac -g Hello.java

 ----jGRASP: operation complete.
If you have other messages indicating errors, check your typing carefully. Your error message will give you the line number of the first place the compiler was "confused" by what you typed.
-
Upon successful compilation, examine the directory (use the file browser) in which you placed your Hello.java file and you should see a Hello.class file.
-
-
Execute your program from jGRASP by clicking the
 button on the toolbar. Under the "Run I/O" tab, you should see:
 ----jGRASP exec: java Hello
Welcome to CS149!

 ----jGRASP: operation complete.
If not, please see the instructor before proceeding.
You have just completed the "edit, save, compile, execute" cycle. Each time you change and save your program, you will need to recompile the source file to see the changes reflected in the executed program.
Part 2: Syntax Errors
Download the Lab02B.txt worksheet and open/edit the file as plain text.
This part of the lab will give you some practice in reading and interpreting syntax errors. As you make each error, pay particular attention to the message produced, and in some cases, a single error will cascade several other errors. Record the answers to the following questions in your lab worksheet.
- Class name different from file name.
Delete the beginning 'H' from the name of the class (so the first non-comment line is
public class ello) and save the program.(Question 1) What happens when you try to save it?
Now compile your program. Keep the
public class ellomistake in the code.(Question 2) What error message do you get during the compile?
- Interpreting the error message.
All compiler messages will begin with the name of the source file (Hello.java) and the line number in that file that contains the error.
(Question 3) What line number was your error on?
- Misspelling inside a string literal.
Correct the mistake above, save, and compile. Next, delete one letter 'l' from the Welcome in the message to be printed (inside the quotation marks). Save the program and recompile it.
(Question 4) Why is there no error message?
Now run the program, and review the "key terms" at the top of this lab.
(Question 5) What type of error just occurred?
- No ending quote mark for a string literal.
Correct the spelling in the string, then delete the opening brace at the end of this line:
public static void main(String[] args) {Save the program and recompile it.
(Question 6) What error message(s) do you get?
- No beginning quote mark for a string literal.
Put the brace back, then remove the closing brace after the
printlnstatement. Save and recompile.(Question 7) What was different about the errors this time?
- No semicolon after a statement.
Put the missing brace back, and remove the semicolon at the end of the line that prints the message. Save the program and recompile it.
(Question 8) What error message(s) do you get?
Remember: A good practice to follow when you have multiple errors is to focus on the first error, correct it, then recompile. Do not try to figure out all of the errors at once!
Part 3: Declaration and Assignment
Recall that a variable can be though of as a named box that holds data. In Java, a variable declaration creates a variable and gives it a name. All variables must be declared prior to their first use in the program. A variable declaration consists of a data type, followed by an identifier, followed by a semi-colon. For example int sum; declares the variable sum to be an int (short for integer).
Add the following line to the program prior to the System.out.println statement.
String message;
This statement declares message to be a variable that can hold a String. Note that String must be capitalized. Skip one line (make one line of white space) and add an assignment statement. This statement will store the String literal "Hello, World" into the variable named message.
message = "Hello, World";
You may use a different string for your message if you prefer.
Finally, change the println statement so that it prints the contents of message instead of a String literal:
System.out.println(message);
Save and recompile your program. Then run it to make sure that the message prints the way that you want it to.
(Question 9) Why doesmessage not have quotes around it?
Part 4: Manipulating Output
System.out.println sends a string to standard output and adds a newline character at the end. What happens if we use System.out.print instead? This section will have you experiment with the output.
-
In your program, add in a second String variable named
message2. Assign to it the value"I'm happy to be a programmer." -
Change your
printlnto useprintinstead:System.out.print(...);Then add anotherprintlnstatement on the next line:System.out.println(message2);Compile and run your program.(Question 10) How many lines of output do you get?
-
After the word
"World"inmessage, put in the code\n. This is one of the escape characters in Java. Recompile and run your program.(Question 11) How many lines of output do you get?
-
In Java,
\nis the newline character and can be used to force a new line wherever we want it. In this case, it is doing the job that theprintlndid before: adding a newline after the last character. -
Finally, remove the second
printlncommand which is printing the second line of the message. Change the other print command to read:System.out.println(message + message2);Recompile and run the program.(Question 12) What output do you get?
Submit both your completed Lab02B.txt and Hello.java via canvas.jmu.edu by [Friday night 11:00pm].
If You Have Time...
For those who finish before the end of the lab period, I have an extra challenge for you. Write a program named Miles.java that converts miles to kilometers (i.e., 1 mile = 1.60934 km). You may use the example code in the Intro Java slides as a starting point.
Acknowledgments
This activity is based on a lab developed by Nathan Sprague based on a BlueJ lab originally developed by Chris Mayfield.